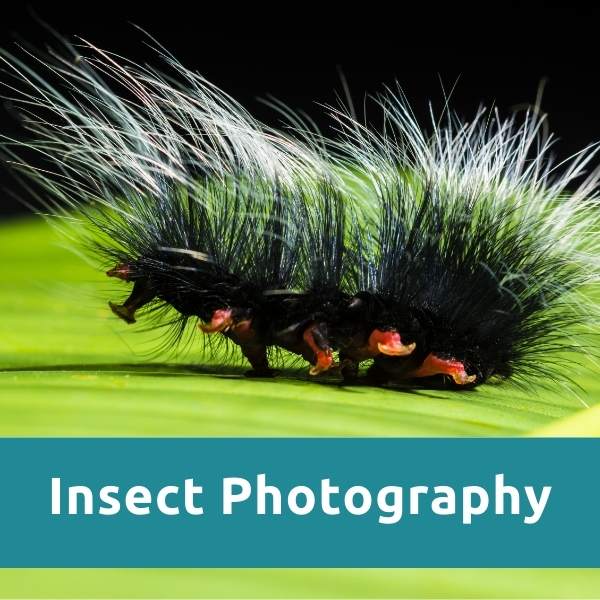
Insect Photography Tips
Macro Lenses and Accessories
By Scott Umstattd

Insect Photography Tips:
This is not normal photography.
Your every day lens can take great shots of landscapes or vacations, but to get a bug's eye view of the world you're going to have to go beyond your normal gear.
To learn more about basic insect photography techniques you can read my companion article where I dole out a number of insect photography tips.
To learn more about the kind of digital photography lenses you will need to make the minuscule look monstrous keep reading this article.
I'm going to cover the types of lenses you will need to go beyond the average all the way to amazing.
And, I'll show you the accessories you can add to your existing lenses to get similar results at a fraction of the cost of a macro lens.
Are you a science teacher? You might like 8 Ways to Use Photography in Your Science Curriculum.
Macro Lenses For Insect Photography
Macro lenses are made for insect photography (and other small things too).
Many lens makers use the term "macro" rather loosely in their marketing efforts. Just because a lens says "macro" doesn't mean it's a macro lens by definition.
By definition, a macro lens is a lens that can produce an image magnification ratio of 1:1 or higher.
Understanding image magnification and how to calculate it requires another article in and of itself as well as a fair share of math.
Put very simply, image magnification refers to the lens' ability to record subjects at their actual size.
A 1:1 magnification ration means that the lens can record an insect at its actual size.
A 1:2 magnification ratio means that a lens can record an insect at half its size.
A 2:1 ratio means that a lens can record an image at twice its size.
To keep things simple (and on track) you should know that if you want a true macro lens, it needs to have a magnification ratio of 1:1, 2:1, 3:1 or higher.
For the purpose of this article and what I think you are looking for, I will only recommend macro lenses that have a 1:1 ratio.
Although I will mention one lens that has an incredible 5:1 magnification ratio.
I will not discuss lenses with 1:2, 1:3, or 1:4 image magnifications.
Don't forget, you can also add accessories to increase the natural magnification of your existing lenses. I will get to that later. Keep reading.

Insect Photography Tips: Look for a macro lens with 1:1 magnification ration. Photo Credit: Marcin Morawiec
One reason why you need a macro lens for insect photography is that they allow you to focus on things at a closer distance than general purpose lenses.
If you use your everyday lens and try to focus on an insect just a few inches away your from lens you may not be able to focus on the insect.
The distance in which a lens is able to find focus is referred to as focal distance. Any lens can focus on something far away. The same is not true for things up close.
Hold a finger (your finger) in front of your face and move it closer. At some point you will not be able to maintain focus on your finger.
You will need to move it back away from your face in order to see that finger clearly.
Macro lenses will allow you to lock in focus much closer to your subject than your everyday lens and even your eyes.
Macro Lenses And Depth Of Field
There is a drawback when you are photographing things up close.
Put your finger back in front of your face and leave it at the closest point where you are able to focus on it.
Notice how everything in the background is out of focus?
Now focus on your background. See how your finger goes out of focus?
Depth of field refers to your lens' ability to focus on things up close and far away at the same time.
Think in terms of thick and thin.
A razor thin depth of field can be seen in a portrait if someone's eye's are in focus and their ears are less in focus or out of focus. I've written another article that focuses solely on depth of field if you want a more detailed explanation.
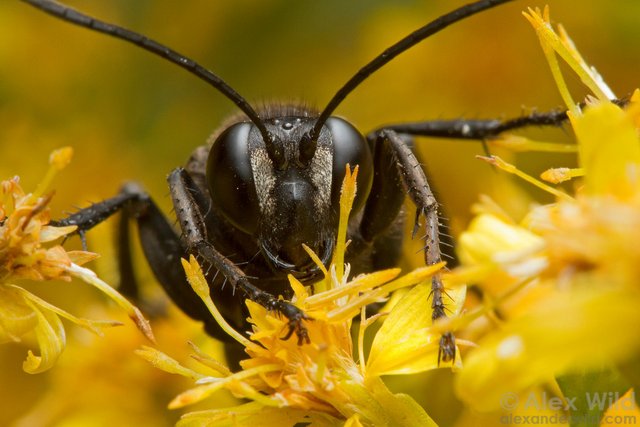
Insect Photography Tips: Macro photography has a thin depth of field. Photo Credit: Alexander Wild
The closer your subject is to your lens, the more challenging it becomes to keep the entire depth of field in focus.
This is important to understand because you will notice that while it may be easy to get a fly's eyes in focus, its tail can easily fade away into a blur of bug butt.
At such short distances its extremely hard for a lens to keep everything in focus.
What you really need to overcome this challenge is a ton of light on your subject. This way you can use a narrow aperture.
Using a narrow aperture (or high f/stop number) increases focus throughout your depth of field.
But it also reduces the amount of light coming through your lens. In contrast, a wide aperture (smaller f/stop number) will let more light come through your lens but it can produce a razor thin depth of field.
Depending on how much light you are using or is available you may need to use a longer shutter speed to compensate for the loss of light when using a narrow aperture.
However, using a longer shutter speed increases the chances that your movement (not that of the insect) will create out of focus or blurry pictures.

Photo Credit: Alexander Wild
There are a lot of options you can choose from when determining how to best steady your camera and how to add more light on your subject.
I've written another article where I go into detail and provide more insect photography tips that show you the kinds of equipment you can use in the field to keep your camera steady when using longer (sometimes called slower) shutter speeds.
And I have another article where I go into detail about lighting for insect photography.
Photography is a constant trade off.
You will always get "this" at the expense of "that". It's not good or bad. It just is. And this is where experience pays off. Knowing how much of "this" you can give up to get "that" is what separates the amazing photographers from the good photographers.
Mastering your exposure settings takes time and patience.
It becomes especially challenging when photographing in low light. You can download my free ebook, Fighting the Evils of Darkness: A Low Light Photography Survival Guide if you really want to conquer low light photography.
Macro Lenses For Insect Photography
Below is a short list of macro lenses that you will find useful in insect photography. I am limiting this list to include only those lenses with a focal length of over 100mm (except for one amazing 65mm lens).
I am limiting this list for two reasons.
One, there are simply too many macro lenses to mention in one article. The other is that you don't want to scare off your subject.
Lenses with a focal length of less than 100mm can certainly do the trick but you have to get much closer to your subject and you risk scaring them off. Just know that as you research the right macro lens for you the lens' focal length will play a role. A longer focal length allows you more distance from your subject.
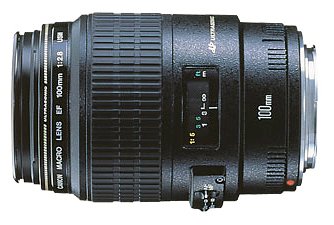
Canon EF 100mm f/2.8 USM Macro Lens - affordable with good image quality. The USM (UltraSonic Motor) means that focusing will be quiet. This is nice because a noisy focusing lens can scare away your subject.
Canon EF 100mm f/2.8L IS USM Macro Lens - less affordable, but the IS (Image Stabilzation) will help to reduce your own body movement. Plus, it's an L lens. Canon L lenses are the best Canon makes. This lens is going to handle the dust, grime, dirt and mud that you may very well face when out in the field.

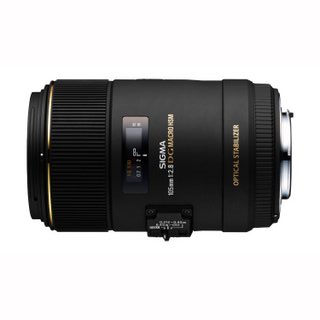
Sigma 105mm f/2.8 EX DC OS HSM Macro Lens - affordable with image quality near that of the more expensive Canon 100mm L macro. The OS (Optical Stabilzation) will help to reduce your own body movement. The HSM (HyperSonic Motor) means that focusing is quite and less likely to scare off your subjects.
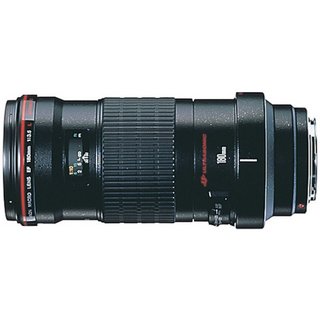
Canon EF 180mmL f/3.5 USM Lens - in every regard this is not a cheap lens. The longer focal length means that you can be a bit farther away from your subject. This is important for insect photography. It lets you keep your distance and avoid scaring off those little buggers.
Sigma 150mm f/2.8 EX DC OS HSM Macro Lens - a great lens that can bring in excellent results. With optical stabilization and Sigma's HyperSonic Motor you can get away with a little more wiggling on your part and you won't scare your bugs away when your lens locks on focus.
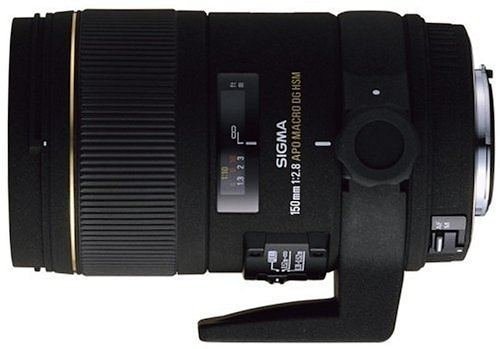
Sigma 180mm f/2.8 EX DC OS HSM Macro Lens - maybe one of the best macro lenses available. While its Canon counter part does not offer stabilization, this one does. They both offer quite focusing.

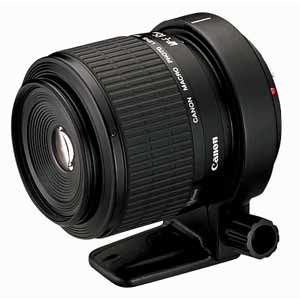
Canon MP-E65 f/2.8 1-5X Macro Lens - this is an incredible lens made exclusively for macro photography. The other lenses listed above can take macro and normal pictures depending on how you set the lens. This lens is small and easy to handle and can create images with an amazing 5:1 magnification ratio.
Pay close attention to the lens' aspect ratio (magnification ratio) when you are shopping for a macro lens. Make sure to look for a 1:1 ratio.
Extension Tubes For Insect Photography
As you may have noticed, macro lenses can get costly.
But you don't have to rely on a macro lens to get in close and take the kind of pictures that make little things look big. Extension tubes are a cheap and easy way to cheat your way into insect photography.

Insect Photography Tips: You don't need to break the bank to get into macro photography. With the right lens accessories you can turn any lens into a macro lens. Photo Credit: Alexander Wild
An extension tube separates your lens from your camera.
It is placed between your lens and your camera and it is attached to both.
It moves the lens away from the sensor and this results in subjects that appear larger on your camera's sensor.

Photo Credit: Overbysara
If you have ever used a magnifying glass you've noticed that as you move it closer to and away from your eyes the image in the glass changes sizes.
In this analogy, your eyes are the sensor and the distance of the glass from your eyes provides a different sized image depending on that distance.
When using an extension tube you can forget about taking "normal" pictures. Extension tubes are designed exclusively for close up photography. You can't take a picture of a UFO with an extension tube attached. Y
our camera and lens will not be able to focus on anything in the distance with an extension tube on it. You would not want magnifying glass on the windshield of your car for the same reason.

Extension tubes can be used with almost any lens and every lens will react differently when an extension tube is added.
I've found that my zoom lenses tend to offer me the best chance to adjust focus when using an extension tube.
And focusing can be tricky with an extension tube.
You may have to focus everything manually even if the extension tube allows for auto focusing.
If you are using a zoom lens you will also need to adjust your focal length as part of your focusing process.

Photo Credit: Alexander Wild
Extension tubes can take some getting used to but you won't be paying hundreds or thousands of dollars. That trade off alone is worth the extra effort for many people.
If you are using a prime lens with an extension tube you may want to get a focusing rail (or slider) or maybe a bellows.
These accessories will allow you to move only the lens closer to or farther from your insect to lock in your focus.
There's more about focusing rails in another article filled with insect photography tips on how to keep your camera steady.
There's more about bellows just ahead.
Extension Tubes for Macro Photography

Fotodiox Extension Tube Set - incredibly affordable way to get into macro photography. This set comes with 3 tubes that can be use separately or stacked together. Be prepared to get very close to your subject if you stack all three and be prepared to turn off your auto-focus.
Xit XTETC Auto Focus Macro Extension Tube Set - a better built option than the Fotodiox mentioned above. Plus, this set of extension tubes will allow you to maintain auto-focus. This set comes with three tubes that can be stacked or used individually. Again, if you stack all three, be prepared to get in very close.
Canon EF 12 Extension Tube - made by Canon, this is a very well-built extension tube. But you only get one tube. This is not a set and it costs more than the sets mentioned above.
Canon EF 25 Extension Tube - like the EF 12, the EF 25 extension tube is made by Canon and build quality is excellent; dust and weather resistant. The EF 25 is larger and will create a larger magnification of your subject than the EF 12. It costs more than the EF 12 too.
If you want, you can add an endless number of extension tubes to move the back of your lens farther away from your camera's sensor. But keep in mind that you will likely be doing only manual focusing.
And, constantly adding or removing extension tubes in the field can be tedious and dangerous.
You don't want to expose your camera's sensor to any dust much less mud, dirt, water or whatever grime you may find yourself in while taking pictures of insects.
Bellows For Macro Photography
I won't spend too much time talking about bellows. They act like extension tubes.
However, a bellows system will allow you to move the lens closer to or farther from your camera's sensor at your discretion.
All you have to do is move the lens closer or father from the camera.
This can be very advantageous in insect photography because you will oftentimes find that you cannot move your camera closer because of bushes, branches, trees, limbs and other things found in nature.

Rather than having to stack and replace a lot of extension tubes a bellows gives you the flexibility to put your lens in the exact spot needed to lock in your focus.
The bellows system seen above is the Cowboy Macro Bellows that comes with a rail slider for precise focusing.
By using a bellows you won't have to add or replace extension tubes based on your location to the insect.
Light is often lost inside the bellows (even though it is light tight).
To overcome this loss of light you want to make sure your are taking pictures on a sunny day or you bring the necessary insect lighting accessories with you.
Reverse Focus Rings for Insect Photography
A reverse focus ring is the easiest way to get into macro photography.
A reverse focus ring allows you to put your lens on your camera backwards.
This produces the same result you get when you look into binoculars backwards.

While this is the easiest and least expensive way to dive into insect photography, it too comes with a trade off.
As you can see in the picture above the rear glass of the lens is not protected by a UV or any other kind of protective filter.

UV filters provide protection of your lenses glass in the event that you knock it up against a tree limb or something. It's better to replace a UV filter than a lens.
When using a reverse focus ring be very careful not to damage your precious lens glass.
Also, before buying any reverse focus ring make sure it is sized to meet the filter thread size of your lens.
These are not a one-size-fits-all add-on. If your lens has a 72mm ring size, you need to buy a reverse focus ring that is 72mm. You can find your lens's ring size by looking at the front of the lens.
Reverse Focus Rings
There are a lot of reverse focus rings out there. Avoid the plastic ones. Metal or aluminum reverse focus rings are better. You don't want your lens to fall off your camera. And remember, make sure it has the same filter thread size as the lens you will be using it with.
These are just two examples of reverse focus rings. Remember to look at your lens' thread filter size to make sure your reverse focus ring will fit.
Fotodioz Reverse Ring Adapter with 58mm Filter Thread
Fotodiox Reverse Ring Adapter with 77mm Filter Thread
Insect Photography Tips - Lenses Recap
Insect photography and macro photography in general will open up new worlds for you.
Once your brain settles in and you move beyond some of the equipment and technical changes it takes to pull off amazing insect photography you will find that you are seeing opportunities everywhere.
Whether you are sitting at a coffee shop or walking in the woods or simply walking around your house once you get into insect (and macro) photography you will see that the possibilities really are endless.

Photo Credit: Alexander Wild
But you have to be prepared. You need to adapt your general purpose lenses if you want them to perform the monumental task of making an ant look like it can eat a city block.
Reverse focus rings and extension tubes are the easiest way to jump into this kind of photography.
The lenses and accessories mentioned in this article will truly give more power to your insect pictures. Once you've gained some experience and enthusiasm shell out a few (hundred) more bucks and get some amazing lenses that will take your insect photography to a new level.
Remember, a true macro lens has an image magnification of 1:1. Look for this ratio if you are serious about buying a macro lens for insect photography.
And managing your depth of field will become your new favorite photography challenge to hate. With macro and insect photography your depth of field will be thin. To get a thicker depth of field, use a lot of light so that you can use a narrow aperture.
Go out. Get dirty and show us some of your best bug shots!
Related articles
- Insect Photography Tips 101: The Down and Dirty On How To Shoot The Itty Bitty
- Insect Photography Tips: Tripods, Monopods, Focus Rails
- Insect Photography Tips: Lighting and Accessories
More from picture power


A COMPLETE PHOTOGRAPHY TEACHING KIT
Return Home from Insect Photography Tips Lenses and Accessories


Search
Picture Power